TL;DR:
- Invisible moisture rising from concrete causes flooring failures in South Florida.
- Proper moisture barriers, like polyethylene sheets or liquid coatings, prevent vapor damage.
- Testing moisture levels first ensures correct barrier choice and long-lasting flooring.
Many new floors in South Florida fail not from poor materials or bad installation, but from invisible moisture lurking beneath the surface. Homeowners spend thousands on beautiful hardwood or laminate, only to watch it warp, buckle, or grow mold within months. The culprit is almost always vapor rising from a concrete slab or saturated ground below. In a climate as humid and moisture-heavy as South Florida, understanding moisture barriers is not optional, it is essential. This article breaks down what moisture barriers are, which types exist, when you need them, and how to avoid the mistakes that lead to expensive floor replacements.
Table of Contents
- What is a moisture barrier in flooring?
- Types of moisture barriers: What are your options?
- When and where do you need a moisture barrier?
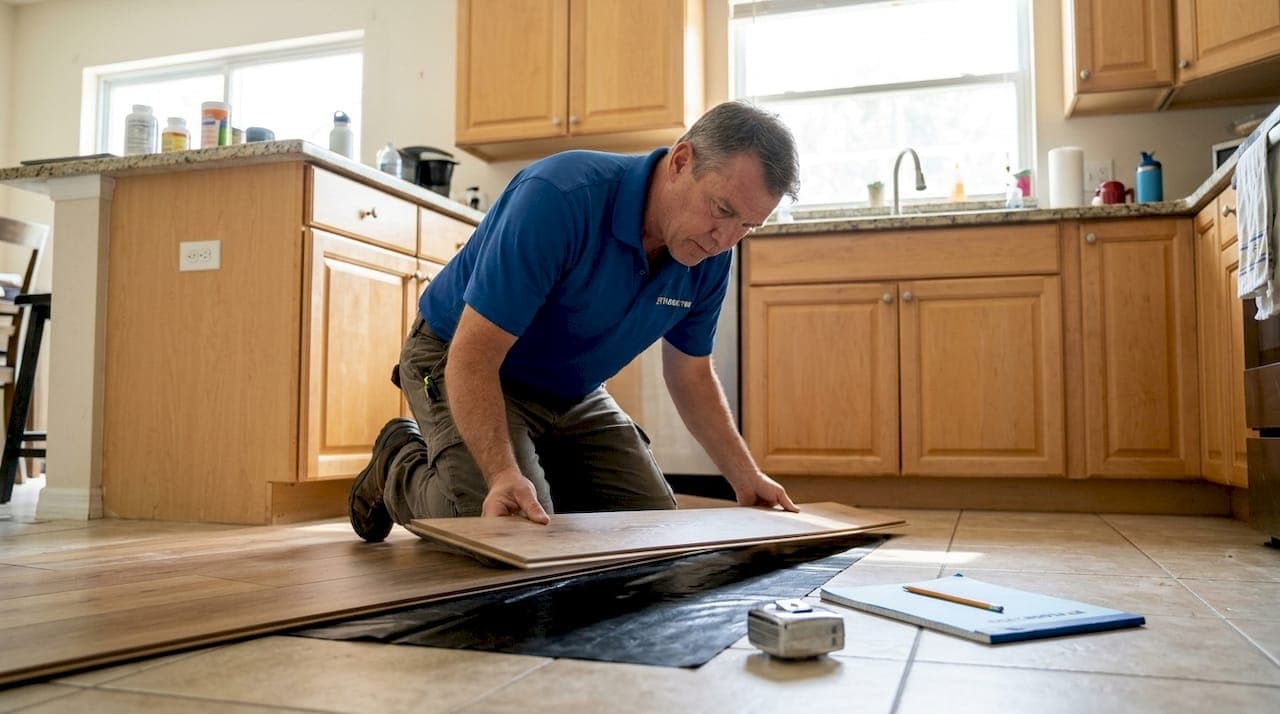
- How to test and install moisture barriers the right way
- Troubleshooting and advanced tips for moisture management
- A contractor's perspective: Why moisture barriers matter more than you think
- Get expert help with your South Florida flooring project
- Frequently asked questions
Key Takeaways
| Point | Details |
|---|---|
| Moisture barriers explained | A moisture barrier blocks vapor from reaching your flooring, preventing hidden water damage in your home. |
| Choose the right type | Pick your barrier material based on your subfloor, flooring type, and South Florida’s humidity risks. |
| Test before installing | Always test subfloor moisture and fix leaks first; the right prep saves you from costly repairs later. |
| Don’t skip the basics | Proper barrier installation and seam sealing are essential—don’t rely on shortcuts or guesswork. |
| Professional help pays off | Expert guidance ensures your flooring and barrier system are matched for your unique home conditions. |
What is a moisture barrier in flooring?
A lot of homeowners picture moisture damage as a visible puddle or flood. The reality is far sneakier. Moisture vapor moves invisibly upward through concrete and soil, a process called vapor migration. You cannot see it happening, but your floors can feel it in the form of cupping, buckling, sticky adhesives, or dark mold patches.
A moisture barrier is a protective material installed between your subfloor and finished flooring to stop that vapor before it reaches your investment. Think of it as a raincoat for your floor system, keeping what's below separated from what's above.
Two terms come up often: vapor barrier and vapor retarder. They sound interchangeable, but they are not.
| Term | Perm rating | What it means |
|---|---|---|
| Vapor barrier | ≤0.1 perms | Nearly no moisture passes through |
| Vapor retarder | 0.1 to 1.0 perms | Slows moisture movement significantly |
| Standard poly sheet (6-mil) | ~0.06 perms | Qualifies as a vapor barrier |
A "perm" is the unit used to measure how much water vapor a material lets pass through. Lower perms mean stronger protection. A 6-mil polyethylene sheet is the most common residential choice and performs well for most South Florida concrete slab situations.
"A moisture barrier in flooring is a protective material installed between the subfloor and finished flooring to prevent moisture vapor from migrating upward and damaging the flooring, adhesives, or causing mold."
Why does this matter more in South Florida than, say, Minnesota? Because the combination of high ambient humidity, warm ground temperatures, and shallow groundwater tables creates near-constant vapor pressure pushing upward through your slab. Exploring best flooring options for South Florida always circles back to this one foundational issue. Get the barrier wrong and even the best flooring product will fail.
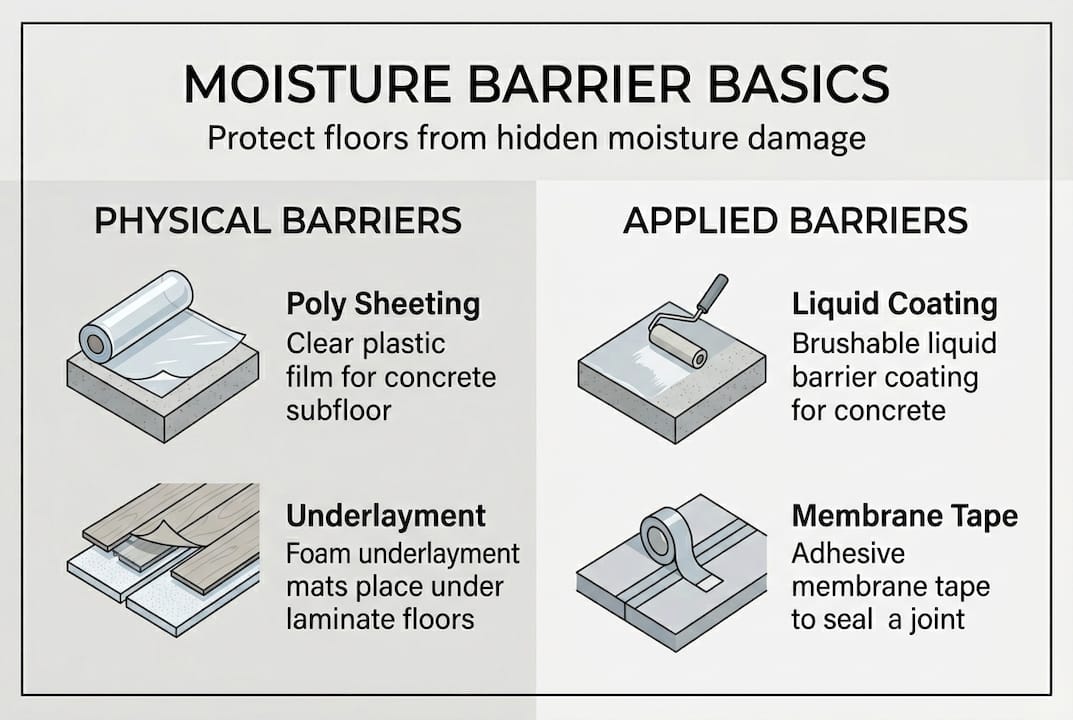
Types of moisture barriers: What are your options?
Not all moisture barriers are created equal, and using the wrong one for your situation wastes money or causes new problems. The main types include polyethylene sheeting, liquid-applied coatings, self-adhesive membranes, and integrated underlayments, each suited to different floors and budgets.
Polyethylene sheeting is the most affordable and widely used option. Rolls of 6-mil poly run roughly $0.10 to $0.25 per square foot. You roll it out, overlap seams by at least 6 inches, and tape every joint. Simple, effective, and budget-friendly.
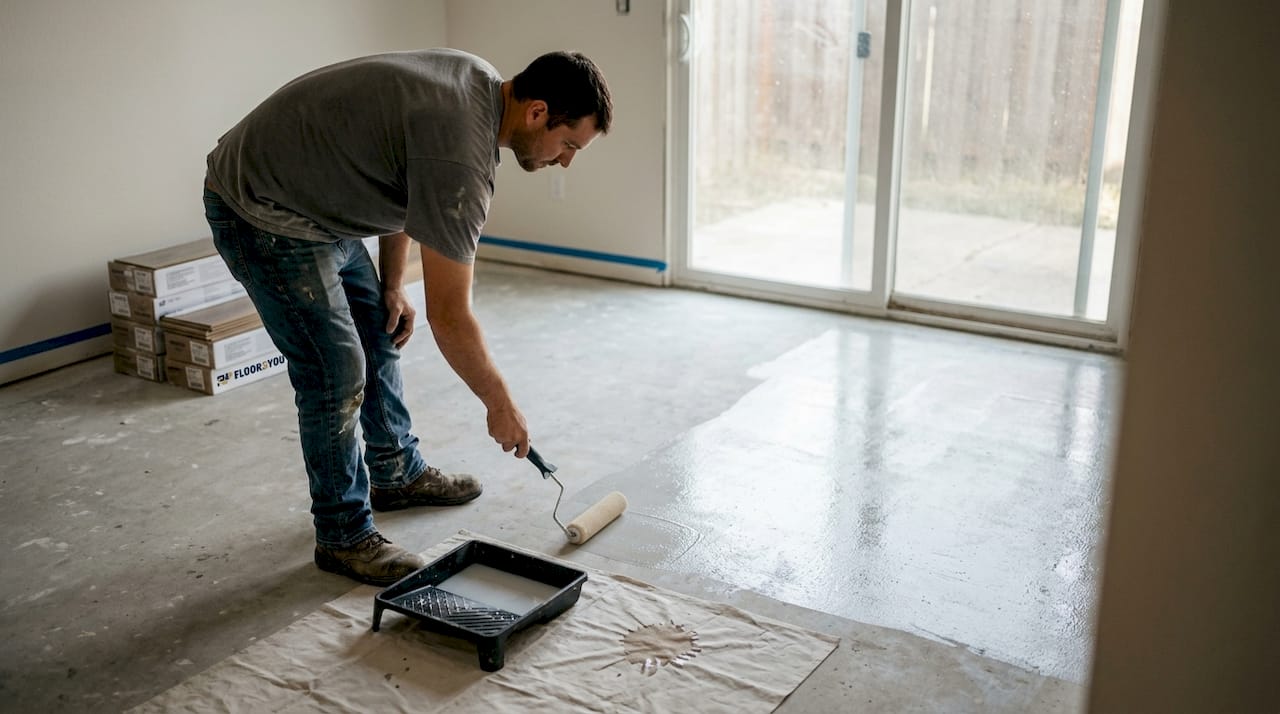
Liquid-applied barriers are brushed or rolled directly onto the concrete surface. They cure into a seamless coating with no seams to worry about. These cost more and are almost always a professional-only job, but they offer superior performance in high-vapor-emission situations.
Self-adhesive membranes peel and stick directly to the slab. They create a strong bond and work well under tile or hardwood where you need both moisture control and crack isolation.
Integrated underlayments combine foam or cork padding with a foil or poly moisture-blocking layer. These are popular under laminate and engineered wood because they handle cushioning and vapor control in one step. Browse flooring underlayment types to understand how these layers work together.
| Type | Cost per sq ft | Best for | DIY-friendly? |
|---|---|---|---|
| Polyethylene sheeting | $0.10 to $0.25 | Concrete slabs, most floors | Yes |
| Liquid-applied coating | $0.50 to $1.50+ | High moisture slabs | No |
| Self-adhesive membrane | $0.30 to $0.75 | Tile, hardwood | Yes (with care) |
| Integrated underlayment | $0.20 to $0.60 | Laminate, engineered wood | Yes |
Here is what each barrier type does best:
- Polyethylene sheeting: everyday concrete slab protection on a budget
- Liquid-applied: when test results show extreme vapor emission levels
- Self-adhesive: under tile in bathrooms or kitchens with extra moisture exposure
- Integrated underlayment: the simplest solution for floating floor installations
For vinyl flooring benefits in South Florida, many waterproof luxury vinyl planks already have a built-in moisture barrier. Always confirm with the manufacturer before adding a separate layer.
Pro Tip: With polyethylene sheeting, the seams are the weakest point. Tape every overlap with proper moisture-barrier tape, not standard painter's tape or duct tape. An untaped seam negates much of the barrier's value.
When and where do you need a moisture barrier?
Knowing which barrier to buy is only half the equation. Knowing when you actually need one saves you from both over-spending and costly omissions.
Moisture barriers are essential in the following situations:
- Concrete slab subfloor (any floor level): Concrete is porous and always holds some moisture. A barrier is standard practice.
- Below-grade or at-grade spaces: Ground moisture pressure is highest here.
- High-humidity climates: South Florida's average relative humidity sits above 75% for most of the year, creating relentless vapor pressure from the ground up.
- Hardwood, engineered wood, or laminate over concrete: These materials are highly sensitive to moisture swings.
- Any remodel following water damage: Even after drying, elevated moisture can linger in slabs for months.
When is a moisture barrier not needed or even harmful?
- Over wood subfloors: A vapor barrier traps moisture between the layers, causing rot and warping.
- Under tested, fully waterproof LVP: If the product is certified waterproof and tests show low vapor emission, adding a separate barrier can trap condensation.
South Florida carries unique risks beyond typical high-humidity climates. Shallow groundwater tables, frequent rain saturation, and warm soil temperatures all elevate vapor pressure year-round. This makes moisture testing before any flooring project non-negotiable. Learning more about professional flooring expertise shows you how local pros account for these specific conditions. A broader look at vinyl flooring options also highlights why product selection and moisture management go hand in hand.
Pro Tip: Before purchasing any barrier product, test your subfloor moisture first. Installing a barrier over an already-saturated slab without addressing the source is like putting a lid on a boiling pot. You need to know your starting point.
How to test and install moisture barriers the right way
Skipping the testing step is the single most common reason floor installations fail within the first year. Moisture testing sounds technical, but the process is straightforward.
Two industry standards apply to concrete subfloors: ASTM F2170 uses a relative humidity probe inserted into the slab, and ASTM F1869 uses a calcium chloride dish placed on the surface. For hardwood, acceptable RH levels are typically 75% or below. Vinyl and laminate tolerate up to 85% RH. Both tests require a minimum of 3 test points per 1,000 square feet.
Here is how the process flows:
- Allow concrete to acclimate: New slabs need at least 60 days to cure before testing.
- Run ASTM F2170 or F1869 tests: For most South Florida homeowners, hiring a flooring pro to run these tests is money well spent.
- Review results against your flooring manufacturer's specs: Every product has a stated moisture tolerance. Match results to those limits.
- Clean and prep the slab: Grind down high spots, fill low spots, and remove any contaminants. A clean, flat surface ensures the barrier bonds or lays correctly.
- Install the barrier with overlapped and taped seams: For poly sheeting, overlap 6 to 12 inches and tape all seams. For liquid-applied, follow product-specific cure times before laying flooring.
- Install flooring immediately after: Leaving a barrier exposed increases the risk of punctures or contamination.
Common mistakes to avoid:
- Skipping moisture testing entirely and guessing based on age of the slab
- Using the wrong barrier type for the flooring product specified
- Failing to tape seams on sheet barriers
- Installing over a wood subfloor where a barrier is not appropriate
For a detailed breakdown of what comes next, installing hardwood flooring walks through the full process step by step. If the testing or installation feels overwhelming, hiring flooring contractors explains what to look for in a qualified local pro.
Pro Tip: A moisture barrier cannot fix a water intrusion problem. If your slab has active leaks, cracks that let in groundwater, or poor drainage around your foundation, fix those issues first. A barrier is designed to manage vapor, not stop flowing water.
Troubleshooting and advanced tips for moisture management
Some situations fall outside the standard playbook, and South Florida homes have more than their share of them.
High vapor emission readings: If your ASTM test results exceed your flooring product's tolerance, a standard poly sheet will not cut it. You need a high-performance liquid-applied barrier or a two-part epoxy coating rated for high moisture vapor emission. Do not try to work around this by switching to a different flooring type without re-testing.
Post-tension slabs: Many South Florida concrete slabs are post-tensioned, meaning they have tensioned steel cables inside. Never drill into a post-tension slab without knowing cable locations. This eliminates certain anchor-based barrier systems and affects how you can prep the surface. Always confirm slab type before planning your installation.
Wood subfloors: It bears repeating because it surprises so many homeowners. Over wood subfloors, installing a vapor barrier traps moisture and causes the wood to warp, rot, or develop mold underneath. Wood needs to breathe. The right answer here is proper subfloor ventilation and addressing any crawl space moisture, not adding a barrier on top.
"In Florida, drainage issues must be fixed first, as vapor barriers cannot stop leaks. High moisture vapor emission rates require mitigation beyond standard barriers."
Here is a quick checklist for advanced situations:
- Confirm slab type (post-tension vs. standard) before planning installation
- Re-test after any drainage or foundation repair work
- Use manufacturer-approved barriers, not generic poly, for premium hardwood installs
- If readings are borderline, upgrade to a liquid-applied barrier rather than hoping for the best
- Never use a barrier as a substitute for fixing drainage, grading, or foundation issues
For choosing flooring types that work well in high-moisture environments, understanding these advanced scenarios helps you make smarter decisions. Pairing the right floor with the right benefits of underlayment creates a system that holds up for decades.
A contractor's perspective: Why moisture barriers matter more than you think
After working on flooring projects across South Florida for years, one pattern keeps showing up. Most floor failures do not come from cheap materials or careless installation. They come from hidden moisture that nobody tested for.
Homeowners often skip testing because the slab looks dry and has been dry for years. But concrete is porous, and South Florida's water table does not care about your schedule. A slab that tests fine in January may read dangerously high in August after a rainy season.
Here is the uncomfortable truth: a roll of 6-mil poly at $0.10 per square foot is cheap insurance compared to a full tear-out and reinstallation that can run $5,000 to $15,000 or more. We have seen homeowners cut that line item to save a few hundred dollars, only to call us back six months later.
The other mistake is treating a barrier as a fix-all. If your grading sends rainwater toward the foundation, or if your slab has hairline cracks letting in groundwater, a vapor barrier will not save your floor. You need to solve the source problem first. Getting professional flooring guidance early in the process helps you identify those problems before they cost you.
Do the testing. Fix drainage issues first. Then install the right barrier for the situation. That sequence never fails.
Get expert help with your South Florida flooring project
Choosing and installing the right moisture barrier is one of those details that separates a floor that lasts 20 years from one that needs replacing in two. It is not glamorous, but it is foundational.

At Floor2You, we handle every step of this process for South Florida homeowners, from moisture testing and subfloor prep to barrier selection and full flooring installation. Our team knows the specific challenges of this climate and we do not cut corners on the steps that matter most. If you are planning a flooring project or renovation and want it done right the first time, visit our expert flooring services page to request a quote or ask us anything. We respond fast and we get it right.
Frequently asked questions
What happens if I don't use a moisture barrier on concrete?
Moisture vapor migrating upward can cause your floor to warp, buckle, and develop mold, and adhesives can fail entirely, resulting in costly repairs or full replacement.
Can I use a moisture barrier over a wood subfloor?
No. Over wood subfloors, a vapor barrier traps moisture between layers, causing the wood to warp, rot, or mold underneath.
How do I test my subfloor for moisture before installing new flooring?
Use ASTM F2170 or F1869 testing methods on concrete slabs, running at least 3 tests per 1,000 square feet for accurate results.
Do I need a moisture barrier under vinyl or laminate floors?
Yes, in most cases over concrete subfloors and in humid climates like South Florida, but always test first since fully waterproof LVP products may not require one.