TL;DR:
- Proper subfloor preparation involves thorough inspection, cleaning, repair, leveling, and moisture testing to ensure long-lasting flooring. In South Florida's humid climate, controlling moisture and verifying flatness are critical steps to prevent future flooring failures. Skipping these essential procedures often leads to costly repairs and premature deterioration of the finished floor.
You scrubbed the floor, swept the dust, and it looks perfectly fine. But that's the trap most homeowners fall into before a flooring installation in South Florida. The surface you can see tells only a fraction of the story. Subfloor preparation, the full process of inspecting, repairing, cleaning, leveling, and moisture-testing the structural layer beneath your finished floor, is what separates a beautiful installation that lasts 20 years from one that buckles, squeaks, or grows mold within 18 months. This article walks you through every critical step and shows you exactly why Florida changes the rules.
Table of Contents
- What is subfloor preparation and why does it matter?
- The critical role of moisture control in South Florida
- How to ensure your subfloor is flat, clean, and structurally sound
- Common mistakes and expert tips for subfloor preparation
- A pro's perspective: What most South Florida projects get wrong
- Get expert help for flawless subfloor preparation
- Frequently asked questions
Key Takeaways
| Point | Details |
|---|---|
| Moisture control is vital | Testing subfloors for hidden moisture prevents costly floor damage in South Florida homes. |
| Proper prep guarantees longevity | A meticulous subfloor preparation process is key to durable, beautiful flooring results. |
| Flatness standards matter | Subfloors should meet strict flatness tolerances to avoid installation and performance issues. |
| Expert advice saves money | Consulting with local flooring pros reduces risk and costly mistakes, especially in complex climates. |
What is subfloor preparation and why does it matter?
Most people think about the flooring they want: the wood grain, the tile pattern, the vinyl plank color. Very few think about what's underneath. That's a costly oversight.
Subfloor preparation is the process of inspecting, repairing, cleaning, leveling, and making the substrate dry and structurally sound so the installed flooring performs and lasts. It is not optional. It is the foundation every flooring product relies on to behave the way it was designed.
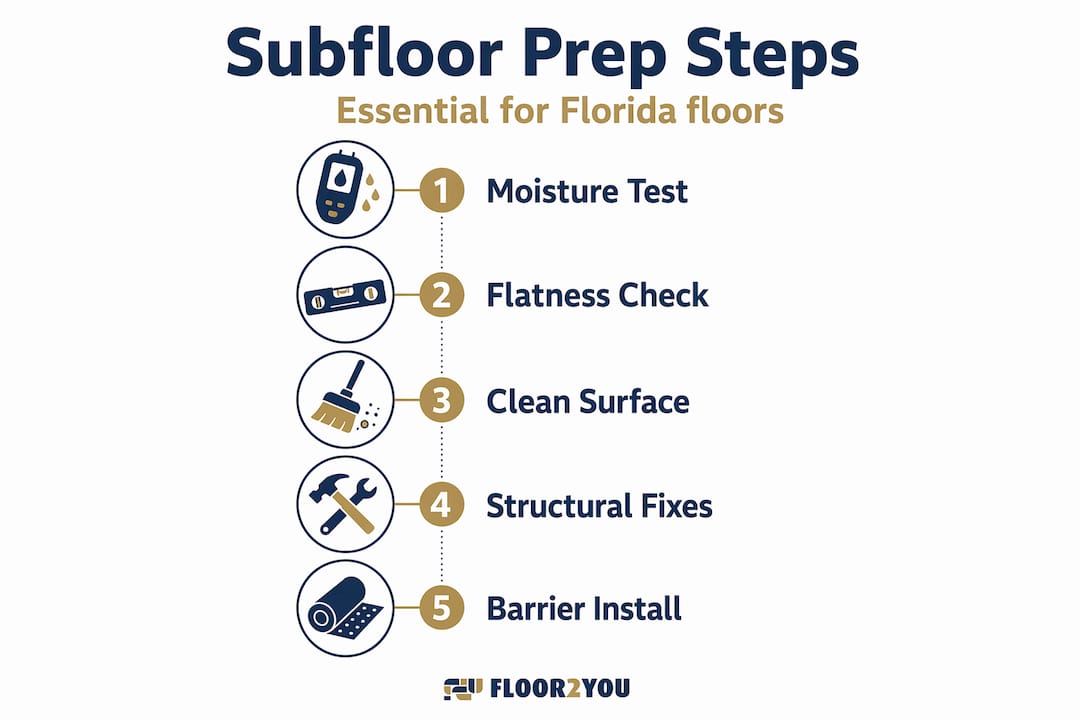
Here is what true preparation looks like, step by step:
- Inspection: Identify cracks, soft spots, rot, squeaky boards, gaps, and height changes across the entire surface
- Repair: Patch concrete cracks, replace deteriorated plywood, secure loose panels or boards
- Cleaning: Remove adhesive residue, paint, grease, dust, and any debris that could prevent proper bonding
- Leveling/flattening: Fill low spots, grind down high spots, or use self-leveling compounds to reach required tolerances
- Dryness verification: Test for moisture at and below the surface before anything else goes down
- Structural soundness check: Confirm the subfloor doesn't flex, bounce, or deflect under foot traffic
Before you even look at a flooring installation checklist, these six steps must be complete. Skip any one of them and you are building on an unstable foundation.
| Common problem from poor prep | What proper prep step prevents it |
|---|---|
| Tiles cracking within months | Leveling removes flex and height variation |
| Hardwood cupping or buckling | Moisture testing and vapor barrier installation |
| Vinyl planks separating at seams | Cleaning removes debris that breaks adhesive bond |
| Squeaking under laminate | Structural repair secures loose panels |
| Mold growing beneath flooring | Dryness verification before installation |
"The subfloor is the most important surface in any flooring installation. No amount of quality in the finished product compensates for problems below it." — industry flooring installation standard, widely cited across professional trade associations
The table above shows a clear pattern. Every single flooring failure that frustrates homeowners traces back to a preparation step that was rushed or skipped entirely. This is not a minor detail. It is the whole game.
The critical role of moisture control in South Florida
Here in South Florida, moisture is not just a concern. It is a constant, year-round opponent working against your floors from the moment they are installed.
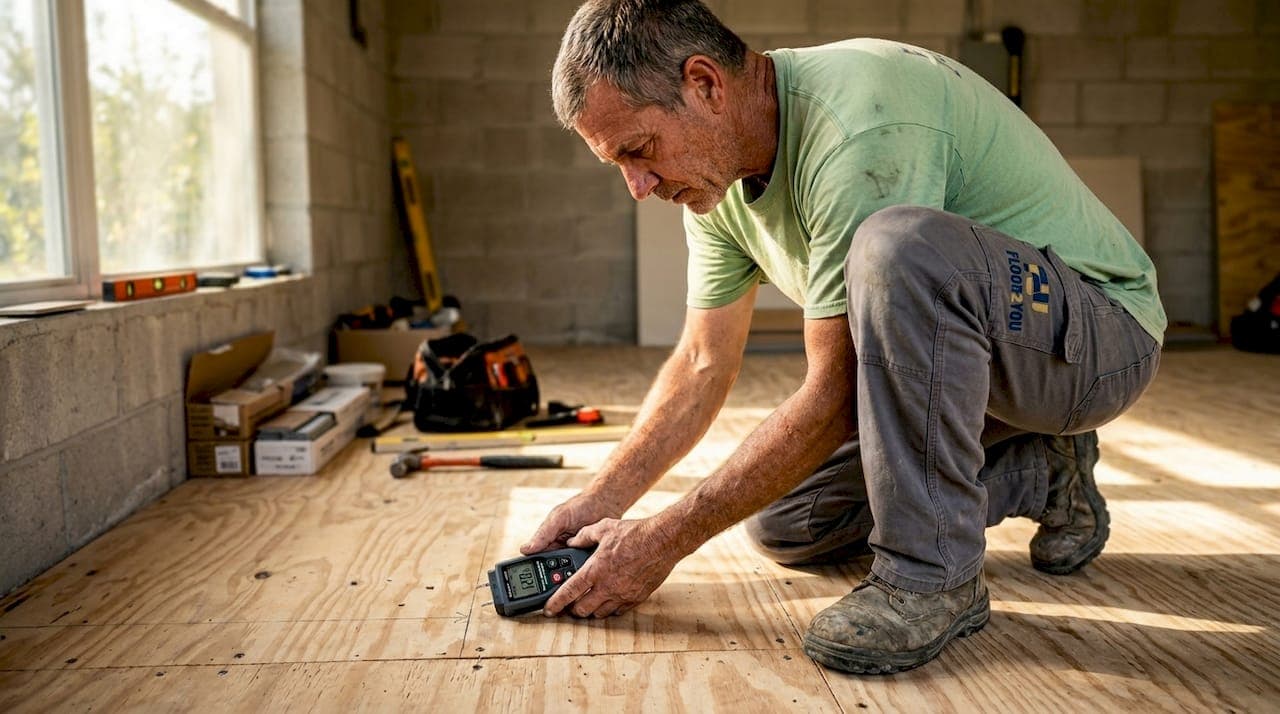
Moisture control is a central part of subfloor preparation, especially in South Florida. The combination of high ambient humidity, frequent rain, and the fact that most South Florida homes sit on concrete slabs creates conditions where moisture migrates upward through the slab continuously. This process, called vapor emission, is invisible to the naked eye. You cannot detect it by touching the floor or even by placing a piece of plastic on the surface for a few hours.
Routine surface testing often misses the full picture. Here is a proper moisture testing process for South Florida slabs:
- Acclimate the space: Close windows and run the HVAC system normally for at least 48 hours before testing to simulate real living conditions
- Perform a qualitative surface test: Tape a 2-foot square of plastic sheeting to the concrete and leave it for 24 hours; condensation underneath signals active vapor emission
- Conduct a calcium chloride test (ASTM F1869): This test measures moisture vapor emission rate in pounds per 1,000 square feet per 24 hours, giving you a quantifiable number
- Use in-slab relative humidity probes (ASTM F2170): These probes are inserted directly into drilled holes in the concrete and measure humidity at the 40% depth level, which is the most accurate method available
- Compare results to your flooring product specs: Every flooring manufacturer sets maximum allowable moisture levels; if your slab exceeds them, you need a mitigation strategy before installation begins
| Testing method | Accuracy | Time required | Best for |
|---|---|---|---|
| Plastic sheet test | Low (qualitative only) | 24 hours | Initial screening |
| Calcium chloride test | Moderate | 60-72 hours | General screening |
| In-slab RH probe | High (quantitative) | 24-72 hours | Definitive pre-install testing |
Pro Tip: If your calcium chloride test reads above 3 lbs per 1,000 sq ft per 24 hours, or your in-slab RH reads above 75%, most flooring warranties will be voided on installation. Always match your test results to your specific product's requirements before proceeding.
Once you have confirmed moisture levels, the next decision is vapor barrier selection. Moisture barriers in flooring range from simple 6-mil polyethylene film to epoxy-based moisture mitigation coatings that bond directly to the concrete. In South Florida, thin plastic sheeting alone is rarely sufficient for concrete slabs. For hardwood and laminate installations, an epoxy coating or a quality sheet membrane is often the right choice.
Choosing the best flooring types for our climate also factors in here. Luxury vinyl plank, for instance, is inherently more moisture-tolerant than solid hardwood, but even LVP requires a properly prepared and moisture-controlled subfloor to prevent the floor from shifting or developing odors over time.
How to ensure your subfloor is flat, clean, and structurally sound
Moisture control is only part of the story. Subfloor performance also depends heavily on surface condition and structure. A floor that passes moisture testing but has dips, ridges, or soft spots will still fail.
The industry standard for acceptable flatness is clear. A practical benchmark for flatness is within 3/16 inch over 10 feet or 1/8 inch over 6 feet. That is a tight tolerance. Most homeowners would be surprised at how quickly their subfloor falls outside that range, especially in older homes or properties that have experienced any water intrusion.
For wood-based substrates and most flooring systems, the subfloor must be flat, clean, dry, and structurally sound before installation. Here is how you check each of those boxes:
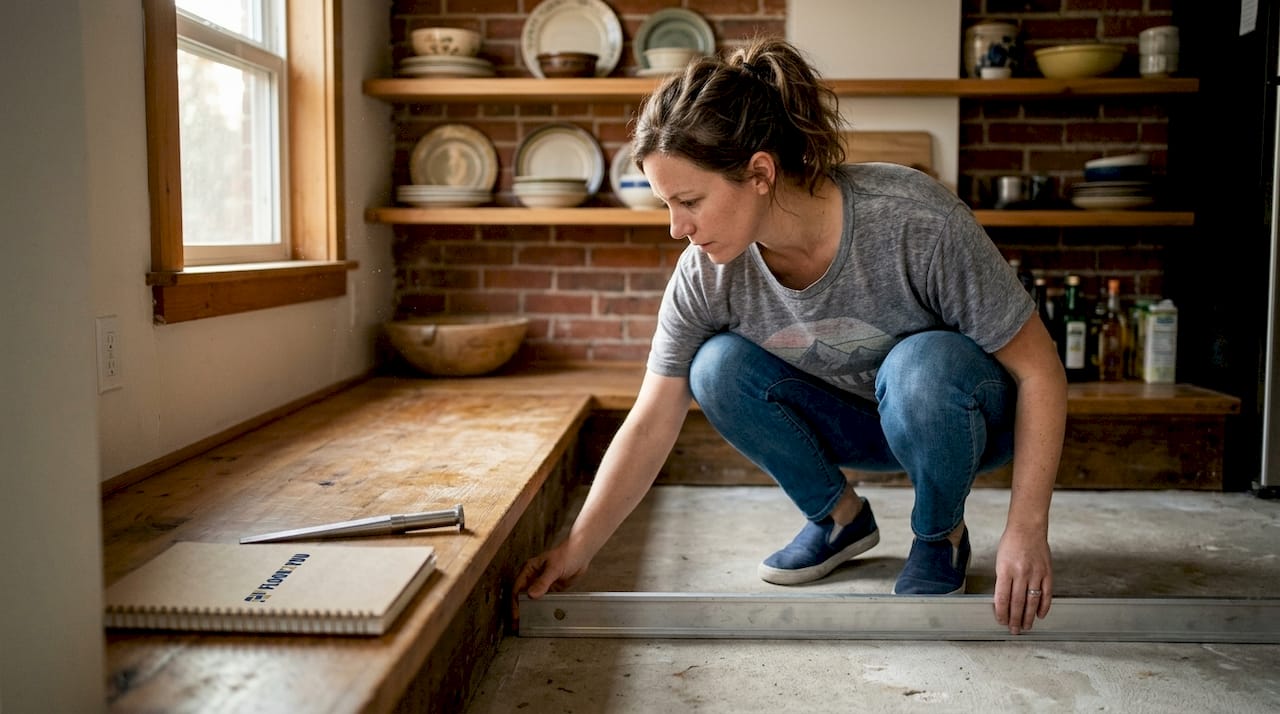
- Flatness check: Use a 10-foot straightedge or level dragged across the floor in multiple directions; mark any areas where the gap under the tool exceeds 3/16 inch
- High spot correction: Grind concrete high spots with a hand grinder, or sand down plywood ridges; never skip this step because underlayment alone will not fix a significant ridge
- Low spot correction: Fill concrete dips with a Portland cement-based patching compound or use a self-leveling underlayment product for large areas
- Cleaning: Remove all adhesive with a floor scraper, degrease any oily patches, sweep and vacuum thoroughly, then damp-mop concrete and let it dry completely
- Structural soundness: Walk every square foot of the subfloor, listening for squeaks and feeling for flex; any area that moves more than 1/16 inch under pressure needs reinforcement
- Fastener check: Re-screw any loose plywood panels using construction screws spaced 6 inches apart along joists; countersink the heads to avoid creating new high spots
Pro Tip: Keep a simple 6-foot aluminum straightedge and a taper gauge in your tool kit before any flooring project. Slide the taper gauge into the gap under the straightedge to get an exact measurement in seconds. This $20 investment can save you thousands in flooring corrections.
Signs that your subfloor needs repair before you call it ready include: consistent squeaking when you walk across it, visible bounce or springiness when you jump in place, discoloration or dark staining that suggests past water damage, soft or spongy areas in plywood, and visible cracks wider than 1/8 inch in concrete.
When it comes to existing flooring acting as your subfloor, the rules are strict. An existing floor can serve as the substrate only if it is completely flat, firmly bonded, and free from damage or moisture issues. Installing over a failing or slightly uneven existing floor to save time is one of the most common reasons for premature floor failure. If you are unsure, pulling up the old material and starting fresh is nearly always the right call.
A good flooring underlayment guide will also clarify which underlayments compensate for minor imperfections and which ones require a perfectly flat surface before installation. Not all underlayments are equal, and selecting the wrong one for your subfloor condition is another common mistake.
Common mistakes and expert tips for subfloor preparation
With the foundational steps covered, it is time to look at the traps that catch even experienced DIYers and some contractors off-guard.
- Skipping the in-slab moisture test: Relying only on the plastic sheet method, or skipping testing altogether because the floor "looks dry," is the single most common and destructive mistake in South Florida flooring projects
- Not checking flatness across the entire floor: Spot-checking one or two areas and assuming the rest is fine leads to surprises mid-installation, especially in large rooms
- Installing over an unfit substrate: Laying new flooring over old, damaged, or warped material to save a day of demo work multiplies the problem and the eventual repair cost
- Using the wrong patching or leveling compound: Not all patching products are compatible with all flooring adhesives; always verify compatibility before application
- Not allowing sufficient cure time: Patching compounds, self-leveling products, and moisture mitigation coatings each require specific cure times before flooring can be installed; rushing this step undoes all the preparation work
- Forgetting to account for height transitions: Adding a new subfloor layer, a self-leveling compound, or a thick moisture barrier changes the finished floor height; doors, transitions, and appliances must be rechecked
"Every dollar you try to save by rushing subfloor preparation costs you three to five dollars in flooring repairs or replacement within five years. We see it constantly in South Florida properties." — common wisdom among experienced regional flooring contractors
For property managers balancing tight turnaround schedules with long-term durability, this math matters most. A rental property that needs floor replacement every four years instead of every twelve is eating directly into your return. The extra day or two spent on proper preparation is not a delay. It is a financial decision.
Pro Tip: If your subfloor reveals more than one of the warning signs listed above, including failed moisture tests, soft spots, and poor flatness together, call a professional flooring advisor rather than trying to tackle all the remediation yourself. Attempting to address compounding issues without the right tools or experience often creates new problems.
The edge cases for preparation include existing flooring acting as the substrate. It can be acceptable only if it is in good condition, level, and free from defects. That "only if" carries a lot of weight. When in doubt, remove it.
A pro's perspective: What most South Florida projects get wrong
After seeing hundreds of flooring installations across South Florida, one pattern stands out more than any other. Homeowners and even some contractors dramatically underestimate how fast Florida's climate acts on a poorly prepared subfloor. This is not a slow failure. In the right conditions, a floor installed over an unaddressed moisture problem can start cupping within three to four weeks of installation.
The second thing most projects get wrong is trusting universal store-bought prep kits. The hardware store moisture test kits, leveling compounds, and vapor barriers sold in chain stores are designed for average conditions. South Florida does not have average conditions. Slab ages, soil conditions, drainage quality, and HVAC habits vary enormously from neighborhood to neighborhood. What works in a newer Weston home may be completely inadequate for a 1970s slab in Hialeah. Local knowledge and specific product selection matter more here than almost anywhere else in the country.
We have seen first-hand what happens when two simple tests, flatness and in-slab moisture, are skipped. In one case, a homeowner installed engineered hardwood over a slab that visually looked dry and felt flat. Within two months, three rows of boards near an exterior wall had cupped noticeably. The in-slab moisture reading that was never taken would have shown a reading well above the manufacturer's limit. The entire installation had to be removed. The cost of the second job was nearly double the first.
For anyone thinking about hardwood flooring in particular, this kind of failure is especially painful because the material itself is a significant investment. Getting the subfloor right protects that investment.
The takeaway is straightforward. Involve a local flooring professional before installation, not after problems appear. A professional with regional experience will know which tests are mandatory for your specific property type, which products perform in Florida's climate, and how to sequence the prep work so nothing is rushed.
Get expert help for flawless subfloor preparation
If this article has shown you one thing, it is that proper subfloor preparation in South Florida is a process, not a single afternoon of cleaning. The moisture, climate, and slab conditions in this region demand a level of attention that generic national guides simply do not address.

At Floor2You, we bring hands-on South Florida experience to every subfloor assessment, moisture test, and flooring installation we handle. Whether you are upgrading your home, preparing a rental property for new tenants, or replacing floors damaged by a past water event, our team provides a thorough preparation process that protects your investment from day one. Reach out today for a consultation and get your next flooring project started on a foundation built to last.
Frequently asked questions
How long does subfloor preparation usually take?
Subfloor preparation typically takes one to three days, depending on the condition of the existing surface and the extent of any moisture issues or leveling work required.
Can you install new flooring over existing flooring?
Yes, but only if the existing floor is flat, level, and entirely free from damage. As the guidelines note, existing flooring as substrate is acceptable only when it meets all those conditions without exception.
What is the most important step in subfloor preparation?
Proper moisture testing is the most critical step in South Florida. Because moisture control is central to subfloor preparation in this climate, skipping it causes more flooring failures than any other single error.
Do I need a vapor barrier under all floors in Florida?
A vapor barrier is strongly recommended for most flooring installed over concrete in Florida. Because moisture from slabs rises continuously in our climate, the barrier prevents hidden damage that may not show up for months.
What does "structurally sound" mean for a subfloor?
A structurally sound subfloor shows no sagging, rot, deflection under foot traffic, or loose panels. As industry standards confirm, the subfloor must be structurally sound before any finished flooring material is installed on top of it.