
TL;DR:
- A kitchen makeover workflow is a carefully planned, step-by-step process that ensures timely and cost-effective renovation progression. Following the correct sequence from protection and demolition to final walkthrough prevents rework, delays, and costly mistakes. Proper pre-construction planning and strict adherence to execution phases are essential for a successful kitchen transformation.
A kitchen makeover workflow is a structured, phase-by-phase process that takes you from early planning through final walkthrough without costly detours. Most homeowners underestimate how much sequencing matters. Get the order wrong and you end up templating countertops before cabinets are level, or waiting weeks for cabinets while your kitchen sits gutted. This guide lays out the full kitchen renovation process in the order that actually works, with specific timing, inspection checkpoints, and the pitfalls that derail even well-funded projects.
What are the key phases of a kitchen makeover workflow?
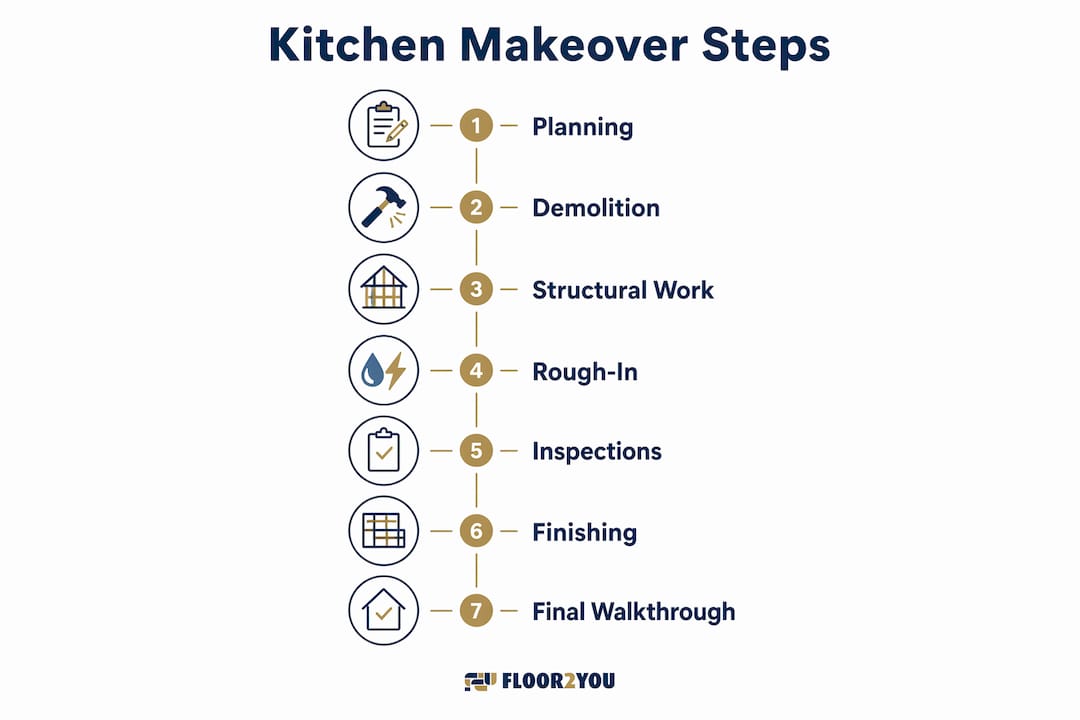
A typical kitchen remodel follows an 11-step sequence from initial protection through final cleaning and walkthrough. That sequence exists for a reason: each phase creates the conditions the next one requires. Skipping or reordering steps does not save time. It creates rework.
Here is the full sequence at a glance:
- Protect adjacent areas and prepare the job site
- Demolition
- Structural changes (walls, windows, doors)
- Rough-in plumbing, electrical, and HVAC
- Staged inspections
- Insulation, drywall, and priming
- Flooring installation
- Cabinet installation
- Countertop templating and fabrication
- Appliance and fixture installation
- Backsplash, finishing details, final cleaning, and walkthrough
Pro Tip: Print this sequence and tape it to a wall in your work area. Every trade you hire should know where their work falls in this order before they start.
Kitchen remodel timelines typically span 12–24 weeks total, with pre-construction taking 4–8 weeks and construction running 8–16 weeks depending on complexity. A 14–18 week timeline is the most common outcome for a mid-range remodel. That number shifts dramatically based on how well you plan before demolition begins.
How to prepare and plan before your kitchen makeover starts
Pre-construction is where most kitchen projects succeed or fail. Decisions made here control your budget, your timeline, and your stress level during construction.
The National Kitchen and Bath Association (NKBA) recommends planning around functional zones rather than just the classic work triangle. Modern kitchens support multitasking and social gathering, so your layout should define separate prep, cooking, cleaning, and storage zones before you finalize cabinet placement.
Here is what your pre-construction checklist should cover:
- Define your goals. Decide what you want to change and why. More storage? Better flow? Updated finishes? Your goals filter every decision that follows.
- Set a realistic budget. Cabinets and hardware typically consume 25–35% of the total budget, labor 20–35%, countertops 10–15%, and appliances 15–20%. Add a 10–20% contingency for surprises. That buffer is not optional.
- Measure accurately. Draw your kitchen to scale. Note ceiling height, window and door placements, and utility locations. Errors here cascade into cabinet and countertop problems later.
- Choose materials and finishes. Select cabinet style, countertop material, flooring, and hardware before ordering anything. Changing your mind mid-project is expensive.
- Order cabinets immediately. Ready-to-assemble (RTA) cabinets take 2–5 weeks to arrive, semi-custom take 6–12 weeks. Order before demolition, not after.
- Pull permits. Most jurisdictions require permits for electrical, plumbing, and structural changes. Skipping this step can block your home sale later.
- Assemble your team. Decide which tasks you will handle yourself and which require licensed trades. Upfront contractor collaboration prevents costly redesigns later.
| Pre-Construction Task | Timing |
|---|---|
| Set goals and budget | Week 1 |
| Finalize design and layout | Weeks 1–2 |
| Order cabinets and materials | Week 2–3 |
| Pull permits | Week 3–4 |
| Confirm contractor schedule | Week 4 |
Pro Tip: Create a shared folder in Google Drive or Notion with your floor plan, material specs, receipts, and contractor contacts. Every decision and purchase should live there.
What is the step-by-step execution sequence during construction?
Construction is where your planning pays off or falls apart. Follow this order without improvising.

Step 1: Protect and Demo Cover doorways with plastic sheeting and protect floors in adjacent rooms before swinging a single hammer. Demolition exposes hidden conditions like mold, outdated wiring, or galvanized pipes. Budget time to address those before moving forward.
Step 2: Structural Changes Move walls, windows, or doors now, before any rough-in work begins. Structural changes after plumbing or electrical rough-ins are installed create expensive conflicts.
Step 3: Rough-In Plumbing, Electrical, and HVAC Run new lines, relocate outlets, and install ductwork while walls are open. This is also when you add recessed lighting rough-ins and under-cabinet lighting wiring.
Step 4: Staged Inspections Plumbing inspections occur at three stages: underground before concrete is poured, above-ground before walls close, and final after fixtures are installed. Skipping any stage risks expensive reopening of finished walls if defects surface later. Schedule electrical inspections on the same timeline.
Step 5: Insulation, Drywall, and Priming Close the walls only after inspections pass. Prime before painting and before cabinet installation to get clean edges without masking.
Step 6: Flooring Install flooring after walls are primed but before cabinets go in. This approach gives you a cleaner finished look and makes future appliance swaps easier. For detailed guidance on this phase, the flooring installation guide from Floor2you covers sequencing and material selection in depth.
Step 7: Cabinet Installation Cabinets go in after flooring. Set base cabinets first, then uppers. Check plumb and level at every unit. Cabinets that are not perfectly level will cause countertop fit problems downstream.
Step 8: Countertop Templating and Fabrication Countertops must be templated only after cabinets are installed and leveled. Premature templating leads to measurement discrepancies that require expensive remedial work. Fabrication typically takes 1–2 weeks after templating.
Step 9: Appliances, Fixtures, and Utilities Connect the sink, dishwasher, range, and refrigerator after countertops are set. This is also when you install light fixtures, faucets, and cabinet hardware.
Step 10: Backsplash and Finishing Details Tile the backsplash after countertops are in place so you can cut tile to fit the exact countertop edge. Caulk, touch-up paint, and install trim last.
Step 11: Final Cleaning and Walkthrough Deep clean the space and walk through with your contractor or checklist. Catch every punch list item before you sign off.
Pro Tip: Do not schedule countertop templating until you have physically confirmed every cabinet is plumb and level. One out-of-level base cabinet can throw off an entire run of stone.
| Construction Phase | Key Dependency |
|---|---|
| Rough-in work | Structural changes complete |
| Inspections | Rough-ins complete, walls open |
| Drywall | Inspections passed |
| Flooring | Walls primed |
| Countertop templating | Cabinets installed and leveled |
What pitfalls can derail your kitchen renovation process?
Most kitchen project failures trace back to a short list of avoidable mistakes. Knowing them in advance is the difference between a smooth project and a costly one.
- Ordering cabinets after demolition. Cabinet lead times govern the entire schedule. If you demo before your cabinets are confirmed and on order, you will live without a kitchen for weeks longer than necessary.
- Skipping staged inspections. Failing to schedule interim plumbing and electrical inspections before drywall goes up risks multi-week delays and costly reopening of finished areas if defects are found.
- Templating countertops too early. Countertop fabricators cannot correct for cabinets that shift after templating. Always template after final leveling.
- Underestimating the budget. Projects without a contingency fund stall when surprises appear. A 10–20% buffer keeps work moving.
- Poor contractor communication. Trades who do not know the sequence create conflicts. Share the full project schedule with every contractor before work begins.
- Not protecting the home. Dust and debris from demolition travel far. Inadequate protection means extra cleanup costs and potential damage to adjacent rooms.
"The most expensive kitchen remodel mistakes are not the ones you make during construction. They are the ones you make in the two weeks before demolition starts."
Pro Tip: Use a free project management tool like Trello or Asana to track each phase, assign tasks, and log decisions. A shared board keeps everyone accountable and gives you a paper trail if disputes arise.
For a broader look at common remodeling mistakes that apply across project types, Floor2you's resource library covers the patterns that show up most often.
DIY vs. contractor-managed: how does the workflow differ?
The kitchen design workflow looks different depending on who is running it. Both approaches follow the same sequence, but the coordination demands are very different.
A DIY kitchen makeover includes measuring and drawing plans, ordering materials early, careful demolition, and stepwise installation through finishing. DIY works well for cosmetic upgrades: painting cabinets, swapping hardware, installing a backsplash, or laying peel-and-stick flooring. Electrical, plumbing, and structural work almost always require licensed contractors, both for safety and permit compliance.
| Factor | DIY Workflow | Contractor-Managed |
|---|---|---|
| Scheduling | You coordinate all phases | GC schedules and sequences trades |
| Cost | Lower labor cost, higher risk of errors | Higher upfront cost, lower rework risk |
| Timeline | Often longer due to learning curve | More predictable with experienced team |
| Permits | Your responsibility to pull and schedule | GC typically handles permitting |
| Best for | Cosmetic updates, low-complexity tasks | Full remodels, structural or utility changes |
For DIY projects, tools like Houzz, RoomSketcher, and the NKBA's planning resources help you create accurate layouts before ordering a single cabinet. Budgeting apps like Mint or a simple Google Sheets tracker keep spending visible throughout the project. If you want a detailed step-by-step kitchen checklist to work from, Floor2you's guide covers both DIY and contractor-managed scenarios.
Key takeaways
A successful kitchen makeover workflow depends on ordering cabinets before demolition, completing staged inspections before closing walls, and templating countertops only after cabinets are fully leveled.
| Point | Details |
|---|---|
| Order cabinets first | Cabinet lead times of 2–12 weeks govern the entire construction schedule. |
| Follow the 11-step sequence | Each phase depends on the previous one; reordering steps creates rework and delays. |
| Budget a 10–20% contingency | Surprises are standard in remodels; a buffer keeps the project moving without stalling. |
| Inspect before closing walls | Staged plumbing and electrical inspections prevent costly reopening of finished areas. |
| Template countertops last | Countertop templating must happen after cabinets are installed and confirmed level. |
What i have learned from watching kitchen projects go sideways
The projects that go smoothly share one trait: the homeowner made hard decisions before demolition started. Not during. Not after. Before. Every time I see a kitchen project stall, it traces back to a decision that got deferred because it felt too early to make.
The most underrated part of the kitchen renovation process is the cabinet order. Homeowners treat it like a purchase they can make anytime. It is actually the starting gun for your entire construction timeline. Miss that window and everything else waits.
I have also seen the countertop templating mistake more times than I can count. Someone gets excited, the cabinets look roughly right, and they call the fabricator. Two weeks later, the stone does not fit because one base cabinet was a quarter inch off. That is a $500 to $2,000 problem that a level and ten minutes of patience would have prevented.
Stay flexible on finishes and rigid on sequence. The color of your grout does not matter much. The order in which you do the work matters enormously. Keep your contractor schedule visible, communicate changes immediately, and do not let enthusiasm push you past the checkpoints that protect you.
— G
How Floor2you supports your kitchen renovation

Floor2you brings South Florida homeowners a full-service approach to kitchen and bathroom remodels, with expert project management built into every job. Whether you need flooring installed as part of a larger kitchen renovation or want a team that handles sequencing, permits, and trades coordination from start to finish, Floor2you delivers the craftsmanship and reliability that keeps projects on schedule. Explore their kitchen remodeling services to see how their team can take the coordination burden off your plate and get your kitchen done right.
FAQ
What is a kitchen makeover workflow?
A kitchen makeover workflow is the ordered sequence of planning, construction, and finishing phases that guides a kitchen renovation from start to completion. Following the correct sequence prevents rework and keeps the project on schedule.
How long does a kitchen remodel typically take?
Most kitchen remodels take 12–24 weeks total, with pre-construction running 4–8 weeks and construction 8–16 weeks. A 14–18 week timeline is the most common outcome for mid-range projects.
When should i order cabinets for a kitchen remodel?
Order cabinets before demolition begins. RTA cabinets take 2–5 weeks to arrive and semi-custom cabinets take 6–12 weeks, so cabinet lead time controls your entire project schedule.
Why does countertop templating have to happen after cabinet installation?
Countertops must be templated only after cabinets are installed and leveled. Templating too early leads to measurement errors that require expensive rework since fabricated stone cannot be easily adjusted on site.
Do i need permits for a kitchen remodel?
Most jurisdictions require permits for electrical, plumbing, and structural changes in a kitchen remodel. Skipping permits can block future home sales and create liability if uninspected work causes damage.