TL;DR:
- Proper surface preparation is essential to prevent tile failure caused by moisture and uneven substrates.
- Following the correct sequencing, including dry-fitting tiles and allowing adhesives to cure, ensures a long-lasting, professional finish.
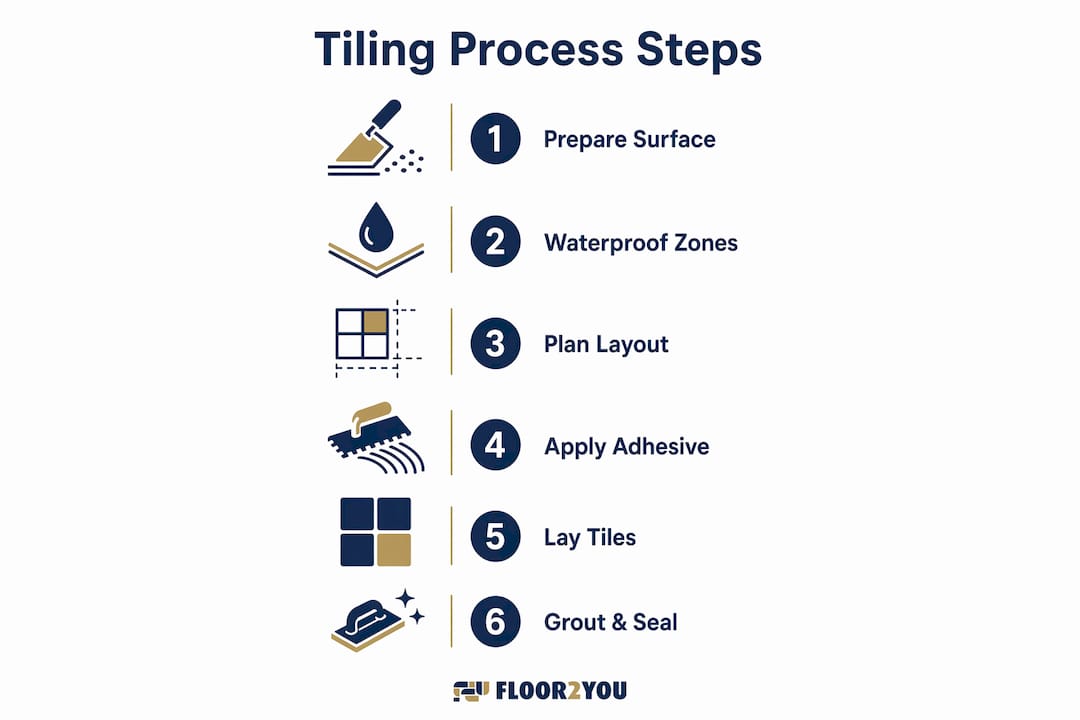
The bathroom tiling process is the methodical sequence of preparing surfaces, planning tile layout, installing tiles with proper adhesive, and finishing with grout and sealant for a waterproof, durable result. Done correctly, it produces professional-quality work that lasts decades. Done carelessly, it produces cracked tiles, failed grout, and water damage behind walls. This guide walks you through every phase of the tile installation workflow, from moisture testing to final sealing, with the specific techniques and materials that separate a lasting finish from a costly redo.
What are the essential preparations for the bathroom tiling process?
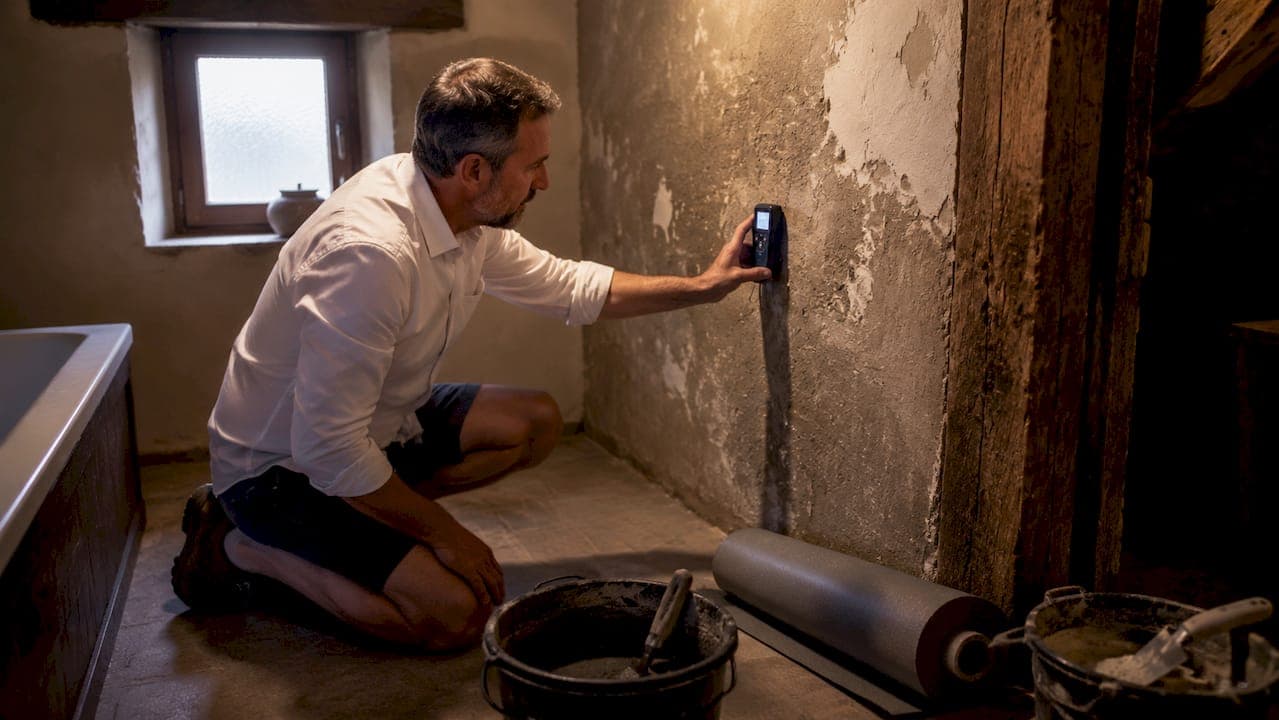
Surface preparation is the single most important phase of any tile installation. No amount of skill during the laying stage compensates for a substrate that is damp, uneven, or structurally weak.
Start with a moisture test. Tape a clear plastic sheet flat against the wall or floor overnight. Condensation under the sheet signals a moisture problem that needs fixing before any tile goes up. Skipping this step is the most common reason bathroom tiles fail within two years.
Next, check the substrate for flatness. Level the substrate to within 3mm over every 2 meters. Any dip or ridge beyond that threshold creates hollow spots under tiles and causes lippage at joints. Use a self-leveling compound on floors and a skim coat on walls to correct these issues. For more on moisture barriers in flooring, Floor2you covers the full range of damp-proofing solutions.
Gather your tools before you mix a single batch of adhesive. The core kit includes:
- Notched trowel (6mm or 10mm V-notch depending on tile size)
- Tile cutter or wet saw
- Tile spacers (1mm–3mm depending on joint width)
- Spirit level and chalk line
- Mixing paddle and bucket
- Waterproofing membrane and primer
- Grout float and sponges
Apply a waterproofing membrane to all wet zones, especially shower walls and floors. After membrane application in a shower, fill the shower pan with water for 24 hours to confirm there are no leaks before tiling begins. This flood test takes one day and can save you from tearing out a finished shower.
Pro Tip: Prime the substrate before applying waterproofing membrane. Primer improves adhesion and reduces the risk of the membrane peeling away from the wall over time.
How to plan and lay out tiles for a balanced, professional look
Layout planning determines whether your finished bathroom looks intentional or accidental. A tile that ends at a doorway as a 2cm sliver looks like a mistake. A tile that ends at a doorway as a full or near-full tile looks deliberate.
Find the room's true center by snapping chalk lines from the midpoints of opposite walls. Where the two lines cross is your starting point. This method works for both floors and walls and gives you a symmetrical layout from the outset.
Follow this sequence for a clean dry-fit layout:
- Lay tiles out dry from the center point toward each wall without adhesive.
- Check the width of the cut tiles at each perimeter. If any edge tile is less than half a tile wide, shift your starting point by half a tile.
- Mark the adjusted center point and re-snap your chalk lines.
- Fix a temporary timber batten along the bottom of the wall at the height of one tile to act as a level guide.
- Plan your cuts around fixtures like toilets, vanities, and shower niches before you start adhering anything.
Dry-fitting tiles before adhering prevents the frustrating scenario of reaching the far wall with a 1cm sliver that cannot be cut cleanly. It takes 30 minutes and eliminates hours of rework.
Tile walls before floors. Professional installers start wall tiling from the second row up, using the temporary batten as a base. The floor tiles go in last, which protects them from adhesive drips and foot traffic during wall work. For a deeper look at installation order rationale, Floor2you's tile selection guide explains the logic behind sequencing decisions.
Pro Tip: Use 2mm spacers as a default for wall tiles and 3mm for floor tiles. Wider grout joints are more forgiving of minor cuts and look cleaner on larger format tiles.
What is the correct tile installation workflow and adhesive technique?
Tile installation follows a strict sequence. Deviating from it produces uneven surfaces, weak bonds, and tiles that crack or pop off within months.
Mix your thinset mortar to a peanut butter consistency, then let it rest. Slaking thinset for 10 minutes after the initial mix activates the chemical binders and produces a stronger, more workable adhesive. Remix briefly after slaking before applying.
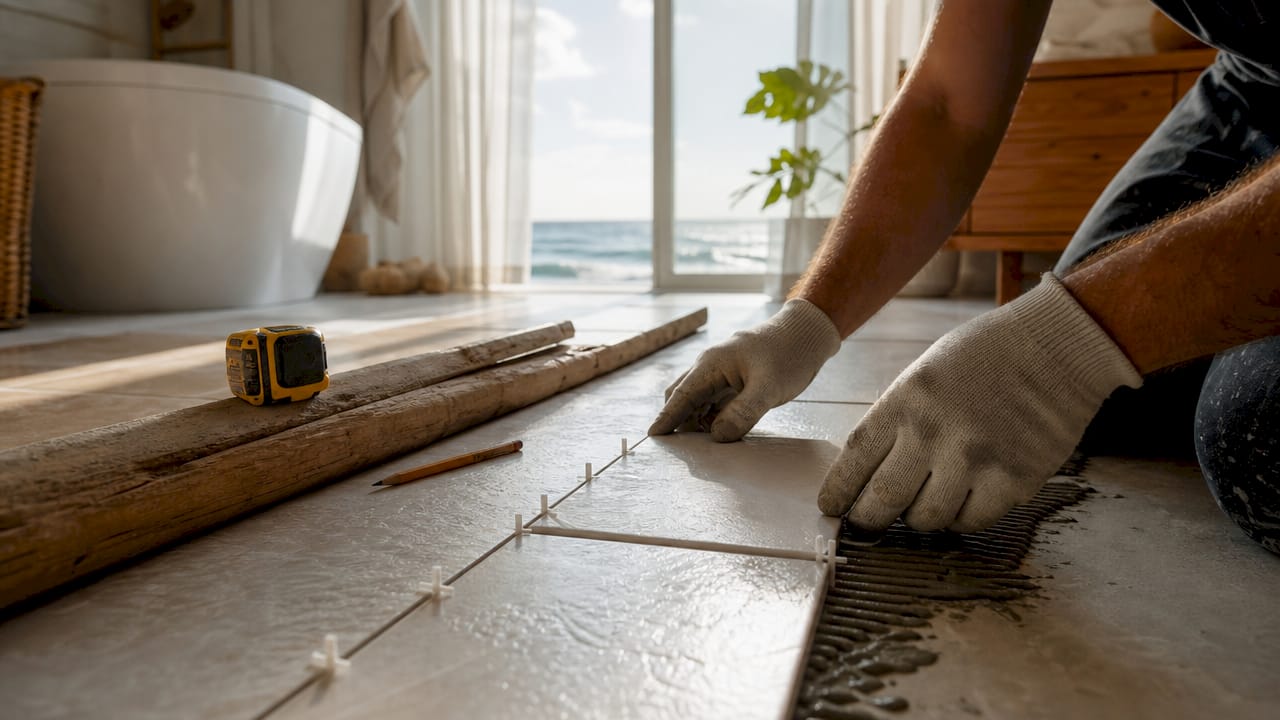
Apply mortar with the flat side of a notched trowel first, pressing it firmly into the substrate. Then comb through it at a 45-degree angle with the notched side to create ridges. Work in sections no larger than 1 square meter at a time so the adhesive does not skin over before you set the tiles.
Key steps during tile placement:
- Press each tile with a slight twisting motion to collapse the ridges and maximize contact.
- Target 85–95% mortar coverage on the tile back. Lift a tile occasionally to check coverage and adjust trowel angle if needed.
- Insert tile spacers at each corner immediately after placing the tile.
- Use a rubber mallet and a beating block to tap tiles flush without cracking them.
- Work from the center outward, checking alignment with a spirit level every three or four tiles.
For large-format tiles (600mm x 600mm or bigger), use a tile leveling system to prevent lippage. These clip-and-wedge systems hold adjacent tiles at the same plane while the adhesive cures. They are inexpensive and make a visible difference in the finished result.
Pro Tip: Back-butter large tiles in addition to applying mortar to the substrate. This double-buttering technique pushes coverage past 90% and eliminates hollow spots that cause cracking under load.
Common pitfalls to avoid during installation:
- Letting adhesive skin over before placing tiles (it loses bond strength rapidly)
- Pressing tiles straight down without the twisting motion
- Skipping spacers on even one joint, which throws off the entire grid
- Walking on freshly laid floor tiles before the adhesive cures
How and when to grout and seal for a waterproof finish
Grouting too early is one of the most common DIY mistakes. Wait a full 24 hours after laying tiles before applying grout. The adhesive needs that time to cure without the added moisture from grout mixing.
Mix grout to a thick paste consistency, slightly stiffer than toothpaste. Apply it diagonally across the tile joints using a rubber grout float, pressing firmly to pack the joints completely. Work in sections of about 1 square meter.
Follow these steps for clean grout lines and no haze:
- Let the grout firm up for 15–20 minutes after application.
- Wipe grout haze with a damp sponge using circular motions, rinsing the sponge frequently.
- Do not wait longer than 20 minutes. Grout haze that dries fully requires acidic cleaners that can damage tile surfaces.
- Allow grout to cure for 48–72 hours before exposing the surface to water.
Silicone sealant, not grout, belongs at every internal corner and movement joint. 100% silicone at corners and transitions accommodates the natural movement of a building. Rigid grout at these joints cracks within months, allowing water behind the tiles. Match the silicone color to your grout for a clean finish.
Pro Tip: Test the grout firmness by pressing a fingertip lightly into a joint. When it holds its shape without sticking to your finger, it is ready to wipe. That window is narrow, so have your sponge and bucket ready before you start.
What are the best materials for bathroom tiling by zone?
Tile selection depends on where the tile goes and how much punishment it takes. The wrong tile in the wrong zone fails faster and costs more to replace.
Porcelain tiles are the correct choice for bathroom floors due to their higher density and resistance to moisture and foot traffic. Ceramic tiles work well on walls, where they carry no load and face less water exposure. Using ceramic on a bathroom floor is a common mistake that leads to cracking and water absorption over time. For a detailed breakdown of tile performance in high-traffic areas, Floor2you's guide covers the full picture.
| Tile type | Best zone | Adhesive type | Key advantage |
|---|---|---|---|
| Porcelain | Floors, wet zones | Flexible/modified thinset | High density, low water absorption |
| Ceramic | Walls, dry zones | Standard thinset | Lightweight, easy to cut |
| Large-format porcelain | Feature walls, floors | Flexible thinset + back-butter | Bold visual impact |
| Mosaic | Shower floors, niches | White polymer thinset | Conforms to curves, high grip |
Flexible or polymer-modified thinset is the right adhesive for shower floors and large-format tiles. Standard thinset is too rigid for surfaces that flex slightly under load. Floor deflection standards require that subfloors meet an L/360 deflection threshold to prevent tile and grout cracking under weight. If your subfloor flexes noticeably when you walk on it, reinforce it before tiling.
Grout joint width also affects material choice. Rectified tiles (machine-cut to exact dimensions) can use 1mm joints. Non-rectified tiles need 3mm or wider joints to accommodate size variation. Forcing non-rectified tiles into tight joints causes the grout to crack and pop out.
Key Takeaways
A successful bathroom tiling project depends on surface preparation, correct adhesive technique, and finishing with silicone at movement joints rather than rigid grout.
| Point | Details |
|---|---|
| Prepare the substrate first | Correct moisture issues and level the surface to within 3mm over 2 meters before tiling. |
| Dry-fit before adhering | Lay tiles without adhesive to check perimeter cuts and avoid narrow edge slivers. |
| Slake thinset before use | Let mixed mortar rest for 10 minutes to activate binders and achieve proper bond strength. |
| Use silicone at corners | Apply 100% silicone sealant at internal corners and transitions, not grout, to prevent cracking. |
| Match tile type to zone | Use porcelain on floors and wet zones; use ceramic on walls and dry areas. |
What I have learned from watching homeowners tile bathrooms
The single biggest predictor of a failed tile job is impatience during preparation. Homeowners who skip the moisture test, rush the substrate leveling, or start tiling the same day they apply waterproofing membrane almost always call for help within a year. The tiles look fine at first. Then a corner lifts. Then a grout joint cracks. Then water gets in.
The second most common mistake is skipping the dry fit. I understand the impulse. You have the tiles, you have the adhesive, and you want to see progress. But dry-fitting takes 30 minutes and eliminates the scenario of cutting a 1.5cm sliver at the doorway that looks terrible and cannot be fixed without pulling up the whole row.
Grout joint width is underrated as a design decision. Narrow joints (1mm–2mm) make a bathroom feel modern and minimal. Wider joints (3mm+) read as more traditional and are more forgiving of imperfect cuts. Neither is wrong, but choosing the wrong width for your tile format creates a mismatch that is hard to unsee once the job is done.
The good news is that the bathroom tiling process rewards careful, methodical work. You do not need professional speed. You need professional sequencing. Follow the order, check your levels constantly, and give adhesive and grout the cure time they need. The result will look like it was done by someone who has tiled a hundred bathrooms.
— G
Floor2you can help you get your bathroom tiling project right
Sourcing the right materials before you start is as important as the technique itself. Floor2you stocks tile cutting tools, waterproofing membranes, adhesives, and grout products suited for South Florida's humidity and renovation conditions.

Whether you are planning a full bathroom remodel or tackling a targeted tile replacement, Floor2you's team provides product guidance and project support from the first measurement to the final seal. Homeowners across South Florida rely on Floor2you for quality materials, honest advice, and the kind of craftsmanship that holds up in wet, high-traffic spaces. Visit Floor2you to review product options, request a quote, or get answers before your first tile goes up.
FAQ
How long does the bathroom tiling process take?
A standard bathroom takes 3–5 days from surface preparation to final grouting, accounting for adhesive and grout cure times. Rushing cure periods is the most common cause of tile failure.
What is the correct order for tiling a bathroom?
Tile walls before floors. Start wall tiling from the second row up using a temporary batten, then lay floor tiles last to protect them from adhesive drips and foot traffic.
Why should I use silicone instead of grout at corners?
Rigid grout at internal corners cracks as the building moves. 100% silicone sealant flexes with movement and keeps water out of joints permanently.
What adhesive coverage do I need under each tile?
Target 85–95% mortar contact on the tile back. Low coverage creates hollow spots that cause tiles to crack under foot traffic or temperature changes.
Can I use ceramic tile on a bathroom floor?
Ceramic tiles are not recommended for bathroom floors. Porcelain is the correct choice because its higher density resists moisture absorption and handles foot traffic without cracking.